Seakeeper 26 Installation Manual (90265-8); S/N 26-233-0690 to Current
2.4.3 Installation of Seakeeper
- Locate and position 4 isolation gaskets onto foundation beams (for metal to metal contacts only).
NOTE: A VERY SMALL AMOUNT OF SEALANT MAY BE APPLIED TO THE GASKET TO KEEP WATER FROM WICKING INTO THE JOINT. Isolation gaskets are only required when mounting to a structure other than aluminum or GRP. - Lower Seakeeper into position onto foundation beams and align over drilled holes.
- Install Mounting Bolts:
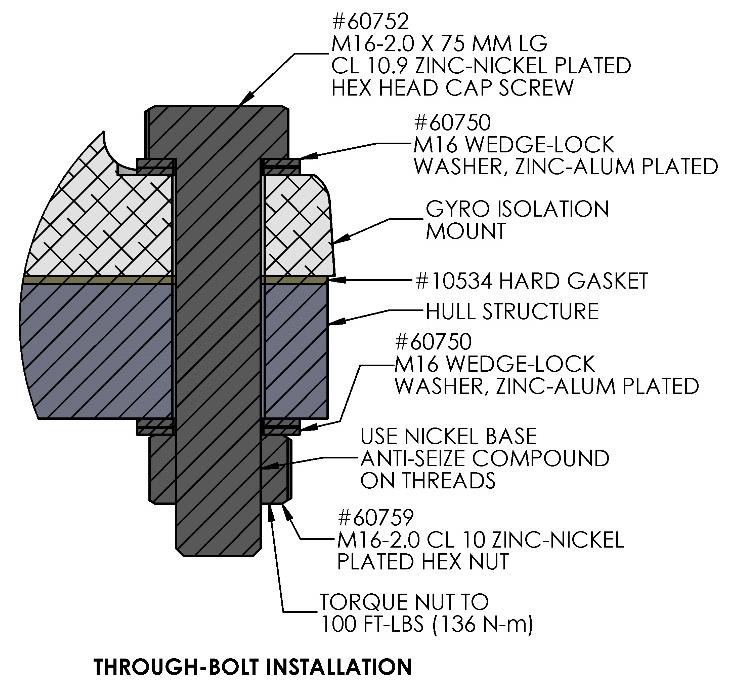
- For Through-Hole installation (P/N 90086 – Seakeeper 26 Thru-Bolt Kit), install the Seakeeper supplied M16 fasteners as shown in figure below to maintain a minimum of two (2) threads protruding past nut. Apply a moderate coat of nickel-based anti-seize(e.g., SAF-T-EZE nickel grade anti-seize, SBT-4N or equivalent) to the threads of each bolt and include a small bead of marine grade sealant (e.g., SILI-THANE 803or equivalent) under each bolt head and washer before installation. See Figure 4 below.
- For Blind-Hole installations (P/N 90614 – Seakeeper 26 Bolt-In Kit), install the Seakeeper supplied M16 fasteners as shown in figure below to maintain a minimum thread engagement of 0.89 in. (23 mm). Apply a moderate coat of nickel-based anti-seize(e.g., SAF-T-EZE nickel grade anti-seize, SBT-4N or equivalent) to the threads of each bolt and include a small bead of marine grade sealant (e.g., SILI-THANE 803 or equivalent) under each bolt head and washer before installation. See Figure 5 below.
- Torque all fasteners to 100 ft-lbs (136 N-m).
- New bolts matching the Seakeeper specification must be used for each installation and reinstallation that meet the requirements listed above.
- Proceed to electrical and cooling portion of the installation.